How to write perfect prompts for Sora 2 (Examples and Guide)
Launched by OpenAI, Sora 2 is the next-generation text-to-video model that not only generates visuals but also supports synchronized audio, refined physics, and greater steerability
In a crowded field of AI video tools, Sora 2 competes with platforms like Runway (Gen-3/Gen-4) and newer entrants (e.g. Pika, Veo) in offering a balance of realism, control, and creative freedom.
Sora 2 & Sora 2 PRO are LIVE on Artificial Studio! Use it here
If you’re a creator, filmmaker, marketer or developer, writing good prompts is your core leverage point. Even with an API, plugin or app interface, your prompt is the “briefing” you give the AI director. This article walks through practical tips to get more consistent, cinematic, and expressive results from Sora 2.
Tip 1: Before you start prompting
- Think of the prompt as a briefing for a cinematographer. If your instructions are vague, the model will improvise—and often not how you intended.
- That said, you don’t need to predefine every detail. Leaving some creative space can lead to pleasantly surprising visuals.
- Iteration is key. Small tweaks—changing a lens suggestion, adjusting the motion, reordering phrases—can yield dramatically different outcomes.
- If your prompt repeatedly fails to produce what you envision, simplify it. Strip it down to the essential elements (subject, action, setting), get a baseline working, then layer in complexity.
This first stage is about anchoring what’s essential before overloading the description.
—
Tip 2: Prompt anatomy that works
A strong prompt often reads like a shot list or mini‐storyboard. The more it mirrors how you’d direct a live shoot, the more controllable the result.
- Describe what appears, where, and how (scene, props, spatial relationships, motion, lighting, style).
- Give your subject anchors—unique visual or behavioral details that let the model “track” them across frames (clothing, posture, accessories, gestures).
- Break actions into beats: e.g. “walks three steps, pauses, looks upward, then turns.” Avoid vague continuous motions unless you add structure or timing cues.
By phrasing in “beats,” you help the model with rhythm and timing rather than letting it guess.
—
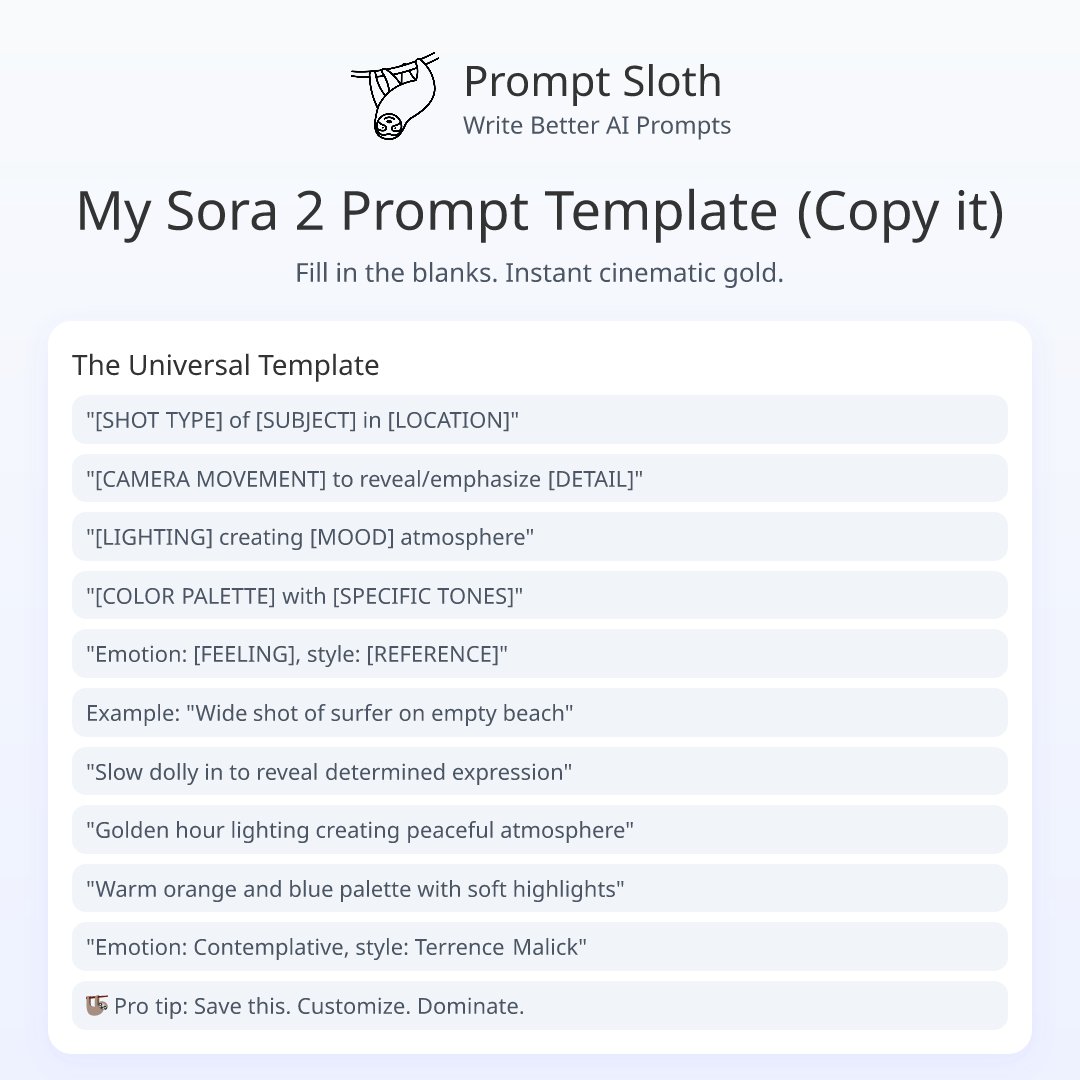
Prompt structure
1. Opening Shot: Start with a [shot type] of [subject description]
Shot type options: wide shot, close-up, medium shot, over-the-shoulder, bird's eye view, Dutch angle, high angle, low angle
2. Camera Movement: [Movement type] [direction] to reveal [what's being revealed]
Movement options: pan (left/right), tilt (up/down), dolly (in/out), truck (left/right), crane (up/down), zoom (in/out), steadicam follow, tracking shot, arc around, whip pan
3. Lighting & Atmosphere: Use [lighting style] lighting to create a [mood/atmosphere]
Lighting options: soft golden-hour, high-contrast noir, diffused natural, dramatic backlit, neon-lit, moody shadows, bright daylight, moonlit, warm candlelight
4. Color Scheme: Employ a [color palette] palette to evoke [emotional tone]
Palette options: monochromatic blue, warm amber tones, vibrant saturated colors, muted pastels, high-contrast black and white, neon cyberpunk, earth tones
5. Secondary Shot/Detail: [Transition word] to a [shot type] of [specific detail/subject]
Transition words: cut, transition, then, followed by, shift
6. Final Emphasis: [Final camera action] to emphasize [emotional beat/story point]
—
Tip 3: Visual cues to control the look
Aesthetic direction early in the prompt helps maintain coherence.
- Name a style or era early: e.g. “70s film noir”, “16mm black & white”, “neo-Tokyo cyberpunk”. That frames your visual identity.
- Use concrete nouns and vivid verbs. Instead of “a beautiful night street,” say “wet asphalt with neon reflections, scattered puddles, glowing signs flickering.”
- Call out lighting, color palette, depth of field: “soft, warm backlight”, “diffused shadows”, “cool blue tones with warm highlights”, “shallow depth of field”.
These cues help the AI interpret “mood” more reliably.
—
Tip 4: Motion & timing
Movement is a major lever—if you control it well.
- In each shot or segment, aim for one clear subject action and one camera motion. Too many simultaneous motions confuse the model.
- Use the “beats” approach again: e.g. “she takes four steps, stops, raises her hand, the camera dolly in last frame.” That gives a temporal anchor.
- Avoid vague instructions like “slowly drift upward” without context. Be explicit: “camera slowly pushes upward over 2 seconds, resolving on her face.”
—
Tip 5: Consistency in lighting & color
When stitching multiple scenes or cuts, inconsistent visual logic is jarring.
- Maintain a coherent lighting model across shots. If scene 1 is dusk, don’t switch to midday sunlight abruptly in scene 2.
- Avoid generic terms like “well lit.” Instead describe light quality (hard, soft, directional), sources (window, backlight, practical lamp), temperature (warm, cool), and dominant tones.
Clear, consistent visual direction ties the scenes together.
—
Tip 6: Use visual reference
Whenever possible, supply a reference image.
- A reference image helps anchor the visual style, character look, props, ambient mood.
- Use it as the initial frame guiding the AI; after that, your prompt describes what changes over time.
That extra anchor often stabilizes the visual identity of a scene.
—
Tip 7: Dialogue and audio
Sora 2 supports synchronized audio generation, so you can prompt for both visuals and sound in one go.
- If there’s dialogue, write it clearly and label who speaks (e.g. Character A: “We must go now.”).
- Adjust how many lines based on clip duration: in a 4s clip, fewer or no lines; in 8s, you have room for more nuance.
- Don’t neglect ambient sound / SFX: “rain tapping on metal roof,” “traffic hum,” “door creak,” “heartbeat” — these give context and pacing.
Treat audio as an equally important direction in your prompt, not an afterthought.
—
** Using the Sora 2 API (for developers) **
If you’re embedding Sora 2 in your product or workflow:
- You’ll set parameters outside of the prompt, like model version, video duration, and resolution. The prompt alone can’t override those.
- Use your prompt to steer style, content, timing, and motion. The API parameters control the frame / size / length envelope.
- You can build workflows that generate variations (A/B) and automatically evaluate outputs (e.g. with metrics or human review loops).
With practice, you’ll internalize this structure so that writing prompts becomes second nature. The difference between a rough clip and a polished, publishable result often comes down to how precisely and purposefully you describe your vision
If you want to use Sora 2 & Sora 2 PRO on Artificial Studio click here
This is just one workflow. Artificial Studio gives you access to 50+ AI tools for video, image, music, branding, marketing & more. Built for creators who move fast.
If you want to know more tips, guides and news on AI follow us on X and Discord!
Mariko - Product Marketing Manager
—
Related reading: